
Kits

This is the wooden kit that I am building

I will be adding the wooden horses as well
Glue and paints

This is the wood glue that I use.

Pimary colors of paint used is yellow, red and black. On wooden models I like to use water-based Americana satins by DecoArt


Silver used for rims around wheels
Parts

First, we check out the parts sheets. The parts are not numbered so I have to select them by sight
Wheels

First, I hate doing spoked wheels. So I decided to do them first and get them over with. The kit comes with two sizes of wheel templates. The front wheels are smaller and the back wheels are large

The double rims are glued together, then they are placed on the templates as shown. The wheel hubs are placed into the center of the templates

The spokes are cut to size from dowl rods

A spot of wood glue is put onto a paper towel and each end of the spokes are dipped into it. It's easier than gluing with the bottle

Spokes are pressed into place using tweezers

Place spokes all the way around the wheel

Finished wheel on the template

Finished wheels. I will paint them later
Wagon Bed


I lay out the bed parts


I glue the barrel racks and the bed together

Clamps are placed on the bed to let the glue dry


When installing the side rails, I used weights to hold them in place to get an even gluing

Side rails and sign board are in place

Bed is now painted yellow

The bed took two coats of paint to fully cover
Undercarriage


First, I lay out the parts to the undercarriage

Then I make my pencil marks and glue the runners in place

Then, I glue the cross rails that will act as the rear axle and front support

The undercarriage is then painted red
The Seat


Seat supports are glued in place

Seat back is glued together

Floor board is glued together at a slant

Seat is then glued to the floor board

Seat is now painted red

Undercarriage cross rails are panited black
Back to the Wheels

The wheels are now painted red

The rims around the wheels are painted silver
Bed Attachment
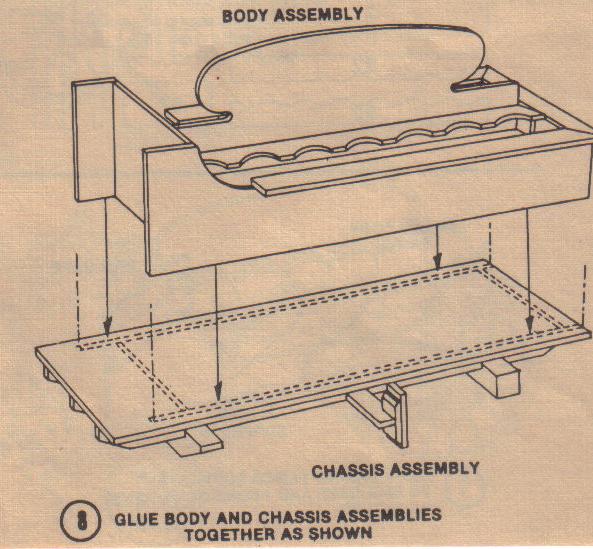

First, I paint the red trip on the bed

Then I glue the bed to the chassis and clamp it


I made the side rails and brake handle

Then I installed the side rails

The front axle assembly


First, I glued the pieces together and clamped them

The assembly was painted red

The front axle was painted black
Adding the decals

The decals with the kit are peel and stick


This one went on the seat, back and front

Installing the wheels


I put the decals on all of the barrels

This is how the barrels will look on the wagon
Brakes

Brakes are glued together and painted black

Brakes are installed and weighted

Front axle assembly is installed along with the brake handle

Wheels are now in place
Finished wagon

I plan to construct the full tounge and add the horses later


